Battery switch on travel trailer function is crucial for managing your RV’s power. Understanding how your battery switch works – whether it’s a single, dual, or rotary switch – is key to preventing electrical issues and maximizing your battery life. This guide will walk you through the different types, their functions, troubleshooting tips, and maintenance advice to keep your travel trailer running smoothly.
We’ll cover everything from safely connecting and disconnecting batteries to understanding how the switch interacts with other electrical components like your converter, inverter, and solar panels. Get ready to become a power management pro!
Battery Switch Types in Travel Trailers: Battery Switch On Travel Trailer Function
Choosing the right battery switch for your travel trailer is crucial for managing your power sources efficiently and safely. This section details the common types available, their inner workings, and their relative strengths and weaknesses. Understanding these differences will help you select the best option for your specific needs and setup.
Single Battery Switch
A single battery switch is the simplest type, designed to connect or disconnect a single battery from the trailer’s electrical system. It’s typically a simple on/off switch.
| Switch Type | Number of Batteries Controlled | Connection Diagram | Advantages/Disadvantages |
|---|---|---|---|
| Single Battery Switch | 1 | Battery (+) ---[Switch]--- Trailer System (+)Battery (-) --- Trailer System (-) |
Advantages: Simple, inexpensive. Disadvantages: Only controls one battery, no isolation for charging or maintenance. |
Dual Battery Switch
A dual battery switch allows you to control two batteries independently. This is useful for managing house and starting batteries separately, allowing you to isolate one while charging the other or for maintenance.
| Switch Type | Number of Batteries Controlled | Connection Diagram | Advantages/Disadvantages |
|---|---|---|---|
| Dual Battery Switch | 2 | Battery 1 (+) ---[Switch Position 1]--- Trailer System (+)Battery 2 (+) ---[Switch Position 2]--- Trailer System (+)Battery 1 (-) --- Trailer System (-)Battery 2 (-) --- Trailer System (-)(Diagram shows a typical configuration where the switch selects either battery 1 or battery 2 to power the trailer system. An “off” position would disconnect both.) |
Advantages: Allows independent control of two batteries, useful for separate house and starting batteries. Disadvantages: Still relatively simple, offers limited control. |
Rotary Battery Switch
Rotary switches offer more control than simpler switches. They typically have multiple positions, allowing for various combinations of battery connections, including isolating batteries for charging or maintenance, or connecting both batteries in parallel for increased power. They are more complex internally, often involving multiple contact points within the switch.
| Switch Type | Number of Batteries Controlled | Connection Diagram | Advantages/Disadvantages |
|---|---|---|---|
| Rotary Battery Switch (3-position example) | 2 or more (depending on switch design) | (Diagram would show three positions: 1. Battery 1 connected, Battery 2 disconnected; 2. Battery 2 connected, Battery 1 disconnected; 3. Both batteries connected in parallel or off). This requires a more complex diagram and is best represented visually. Think of a rotating dial selecting different connection points. |
Advantages: Offers more control over multiple batteries, allowing for isolation and parallel connection. Disadvantages: More expensive and complex than simpler switches. |
Comparative Analysis Under Load
Under heavy load conditions (e.g., running an air conditioner and microwave simultaneously), a single battery switch connected to a single battery will quickly deplete that battery. A dual battery switch allows you to switch to a second battery, extending your runtime. A rotary switch, with both batteries connected in parallel, offers the longest runtime by providing the combined capacity of both batteries.
However, if one battery is significantly weaker than the other, the stronger battery will do most of the work, leading to faster depletion. Regular maintenance and monitoring of battery health are important regardless of the switch type used.
Function and Purpose of the Battery Switch
The battery switch in your travel trailer is a crucial component of its electrical system, acting as the central control for power distribution from your batteries. It allows you to easily manage power flow, preventing unwanted battery drain and ensuring the longevity of your power sources. Think of it as a master switch, giving you precise control over which batteries are connected to your trailer’s electrical system and which devices are drawing power.The primary function of the battery switch is to isolate or connect different battery banks within your travel trailer.
Most RVs have at least two battery banks: a house battery bank that powers interior lights, appliances, and other conveniences, and a chassis battery bank that powers the engine starting system and other essential functions. The switch allows you to selectively power these different systems independently or together, maximizing efficiency and preventing unwanted discharge. For example, you can disconnect the house batteries while traveling to conserve power, ensuring your chassis battery is still available to start the vehicle.
Managing Multiple Batteries
A battery switch simplifies the management of multiple batteries, offering several key advantages. It prevents accidental cross-draining between the house and chassis batteries, a common problem that can lead to a dead battery when you need it most. By isolating the house batteries, you prevent devices plugged into the RV from draining the starting battery while parked. Conversely, it allows you to easily charge both battery banks simultaneously using a single charging source, ensuring both are ready for use.
The switch offers a convenient point of control, preventing unnecessary power drain and extending the lifespan of your batteries.
Safety Implications of Improper Usage
Improper use of the battery switch can lead to several safety hazards. Connecting batteries incorrectly can create sparks and potentially ignite flammable gases near the battery terminals, leading to fire or explosion. Similarly, failing to disconnect batteries before performing maintenance on the electrical system increases the risk of electric shock. Always ensure the switch is properly positioned before making any connections or performing any maintenance, and always consult your RV’s manual for specific instructions.
Safe Battery Connection and Disconnection
Before working with batteries, always wear appropriate safety glasses and gloves. Battery acid is corrosive, and the potential for sparks necessitates caution.
- Step 1: Identify the Battery Switch Positions: Familiarize yourself with the positions of your battery switch. Commonly, you’ll find positions for “Off,” “House,” “Chassis,” and “Both.”
- Step 2: Turn the Switch to the “Off” Position: Before disconnecting or connecting any batteries, always start with the switch in the “Off” position. This isolates all batteries from the system, preventing accidental shorts or sparks.
- Step 3: Disconnect Batteries (if necessary): If you’re disconnecting batteries, use the appropriate wrench to loosen the battery terminal clamps. Always remove the negative (-) terminal first and then the positive (+) terminal.
- Step 4: Connect Batteries (if necessary): When connecting, attach the positive (+) terminal first, followed by the negative (-) terminal. Ensure the connections are tight to prevent sparking or corrosion.
- Step 5: Select the Desired Switch Position: Once connections are secure, select the appropriate switch position (“House,” “Chassis,” or “Both”) depending on your needs.
- Step 6: Verify System Operation: After changing the switch position, check the operation of the relevant systems to confirm the batteries are correctly connected and functioning.
Troubleshooting Common Battery Switch Issues
Your travel trailer’s battery switch is a crucial component, ensuring you can easily manage power to your house batteries. Problems with this switch can leave you stranded without lights, appliances, or even the ability to start your tow vehicle. Understanding common issues and how to troubleshoot them is essential for any RV owner.
So, you’re planning a trip? Awesome! Don’t forget travel insurance! Seriously, it’s a lifesaver. Check out aon travel insurance for comprehensive coverage. They’ve got options for everything from lost luggage to medical emergencies. And if you want another option to compare, aon travel insurance also offers solid plans; it’s always good to shop around for the best deal that fits your needs.
Getting insured is just smart travel planning!
Several problems can arise with your travel trailer’s battery switch, ranging from simple fixes to more complex repairs. These issues often stem from the harsh conditions these switches endure, exposed to the elements and potential for vibration during travel. Knowing what to look for and how to approach troubleshooting can save you time and frustration.
Common Battery Switch Problems
The most frequent issues involve corrosion, loose connections, and switch failure itself. Corrosion, often caused by moisture and exposure to the elements, builds up on the terminals and switch contacts, hindering the flow of electricity. Loose connections, resulting from vibration or improper installation, create intermittent power or complete failures. Finally, the switch itself can fail due to age, wear, and tear, or simply from overuse.
Troubleshooting Flowchart
A systematic approach is crucial for efficient troubleshooting. The following flowchart provides a step-by-step guide to diagnose battery switch problems:
- Check the Battery Switch’s Position: Ensure the switch is correctly set to the position that should provide power (e.g., “On,” “Both,” or “Batteries”). A simple oversight can be the cause of the problem.
- Inspect for Corrosion: Carefully examine the battery terminals and the switch contacts for any signs of corrosion – a whitish, greenish, or bluish buildup. Clean any corrosion with a wire brush and baking soda paste, ensuring thorough cleaning and drying before reconnecting.
- Check for Loose Connections: Tighten all connections at the battery terminals and the switch. Loose connections often cause intermittent power or complete failures. Make sure all nuts and bolts are secure.
- Test the Switch with a Multimeter: Use a multimeter to check the continuity of the switch in each position. This verifies whether the switch is correctly completing the circuit. If the multimeter doesn’t show continuity when the switch is in the “On” position, the switch is likely faulty.
- Inspect Fuses: Check any fuses associated with the battery switch. A blown fuse indicates a short circuit somewhere in the system. Replace any blown fuses with fuses of the correct amperage rating. If fuses keep blowing, there is a more serious problem in the system that needs to be addressed.
- Test Battery Voltage: Use a multimeter to check the voltage of your batteries. If the voltage is low, the problem may lie with the batteries themselves, not the switch.
Addressing Poor Connections and Blown Fuses
Poor connections are usually addressed by cleaning corrosion and tightening connections. Use a wire brush to remove corrosion from battery terminals and the switch contacts. Then, apply a dielectric grease to the terminals to prevent future corrosion. For loose connections, ensure all nuts and bolts are properly tightened. Always replace blown fuses with fuses of the correct amperage rating; using an incorrect amperage can damage your system or create a fire hazard.
If fuses continue to blow after replacing them, you likely have a short circuit in your wiring that needs professional attention.
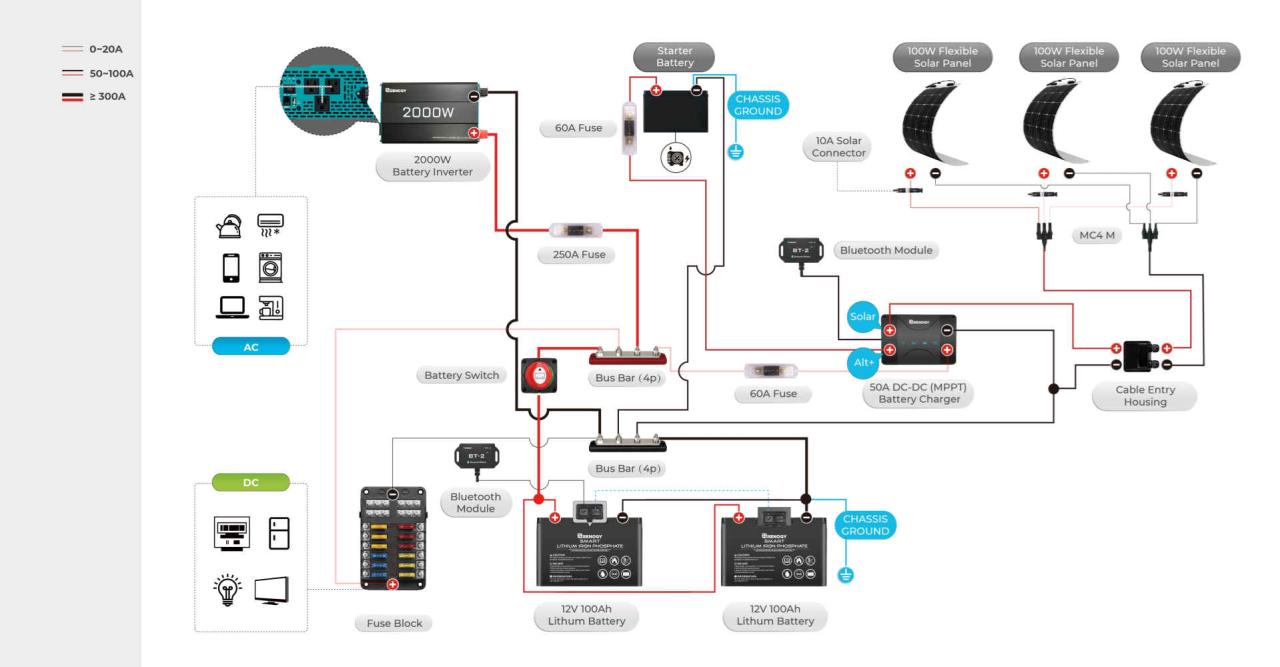
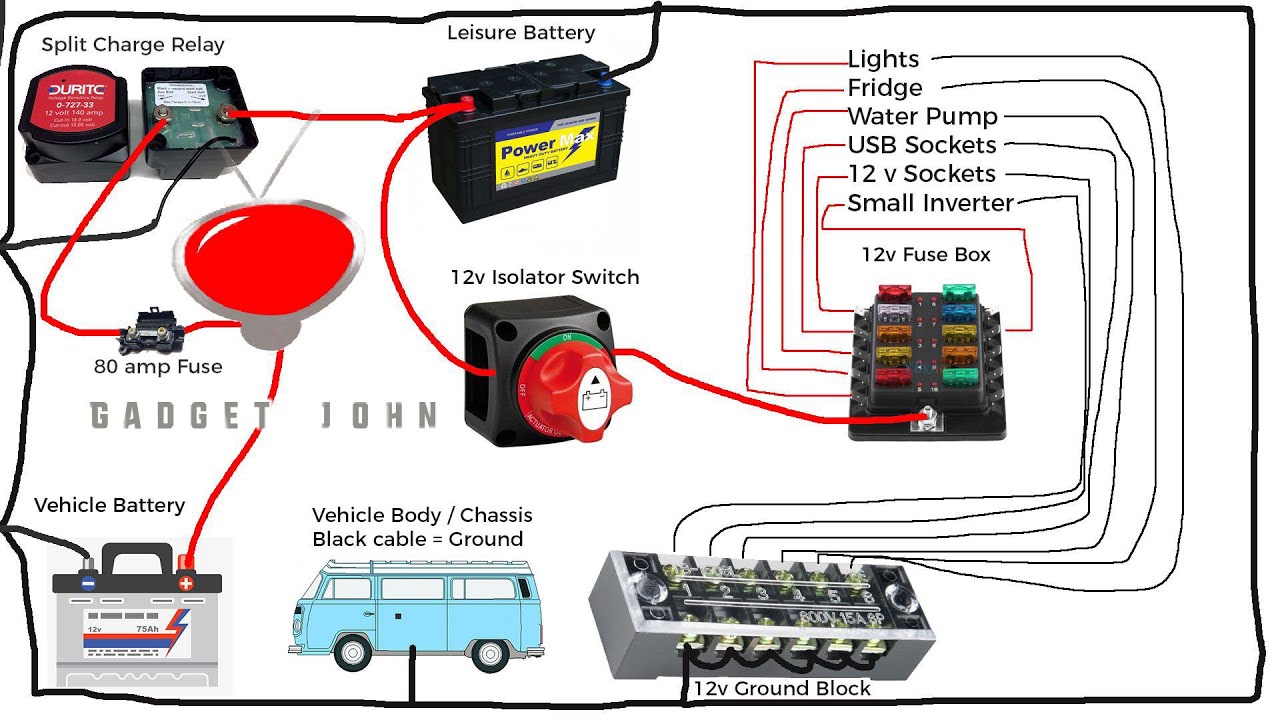
Battery Switch and Electrical System Integration
The battery switch isn’t an isolated component in your travel trailer’s electrical system; it’s a crucial control point that dictates how power flows between your batteries and other electrical devices. Understanding its interaction with other parts is key to maintaining a reliable power supply. This section details how the switch works in conjunction with your converter, inverter, and solar panels.
The battery switch acts as a central hub, managing the flow of power from your house batteries to the rest of your RV’s electrical system. It allows you to disconnect the batteries completely for safety or storage, or to select which battery bank (if you have multiple) powers your appliances. This interaction ensures that you can control power distribution efficiently and safely.
Electrical System Pathway Diagram
The following diagram illustrates a typical electrical pathway in a travel trailer, showing the battery switch’s role and how different components connect.
| Component | Connection | Power Flow | Notes |
|---|---|---|---|
| House Batteries | Connected to Battery Switch | From Batteries to Switch | Typically 12V DC |
| Battery Switch | Connects to Converter, Inverter, and potentially Solar Charge Controller | Controlled flow to other components | Off, Battery 1, Battery 2, Both (depending on switch type) |
| Converter | Connected to Battery Switch and AC Power Inlet | 12V DC from Battery, 120V AC to Appliances | Converts 12V DC to 120V AC |
| Inverter | Connected to Battery Switch | 12V DC from Battery, 120V AC to Appliances | Converts 12V DC to 120V AC; usually for smaller appliances |
| Solar Panels | Connected to Solar Charge Controller | DC Power from Panels to Batteries | Charges the house batteries |
| Solar Charge Controller | Connected to Solar Panels and Batteries | Regulates solar power to batteries | Prevents overcharging and protects batteries |
| Appliances (Lights, Fridge, etc.) | Connected to Converter or Inverter | 120V AC or 12V DC from Converter/Inverter | Powered by either AC or DC |
Wiring Configurations and Battery Switch Functionality
Different wiring configurations directly influence how the battery switch controls power. For example, a simple system might connect the battery switch directly to the converter and inverter. More complex setups might incorporate a distribution panel that further regulates power flow to individual appliances. A system with multiple battery banks will require a switch capable of selecting individual banks or both simultaneously.
Consider a scenario with two battery banks. A two-bank battery switch allows the user to select either bank 1, bank 2, both, or neither. If the switch is in the “both” position and one bank fails, the other will still power the system, though at reduced capacity. However, if the wiring only allows power from one bank at a time, a failed bank would completely shut down the system regardless of the switch position.
Similarly, a system with a solar panel setup requires the solar charge controller to be wired correctly. The controller typically charges the batteries directly, bypassing the battery switch. This is crucial because solar charging should continue even if the battery switch is turned off to prevent over-discharge. Incorrect wiring could damage the solar controller or batteries.
Maintenance and Care of the Battery Switch
Proper maintenance of your travel trailer’s battery switch is crucial for ensuring reliable power and extending the lifespan of your batteries and the switch itself. Neglecting this can lead to corrosion, poor connections, and ultimately, system failure. Regular cleaning and inspection are key to preventing these problems.
Routine Maintenance Schedule
A simple routine will keep your battery switch in top shape. Ideally, you should inspect your battery switch every three months, or before and after each extended trip. This involves visually checking for corrosion, loose connections, and any signs of damage. A more thorough cleaning should be performed at least once a year, or more frequently in harsh environments (coastal areas, high humidity).
Cleaning and Inspection Procedures
Before starting any cleaning or inspection, always disconnect the battery’s negative terminal to prevent accidental shocks. Use a wire brush or sandpaper to gently remove any corrosion from the switch terminals and battery posts. Pay close attention to the area where the cables connect to the switch. A baking soda paste (baking soda mixed with water) can be applied to neutralize any acid buildup.
After cleaning, rinse the area with water and allow it to dry completely before reconnecting the battery. Visually inspect the switch itself for any cracks, damage, or loose components. If you find any issues, consult a qualified technician before using the switch again.
Corrosion Prevention
Corrosion is the biggest enemy of your battery switch. To prevent it, apply a thin layer of dielectric grease to the battery terminals and switch terminals after cleaning. This grease creates a barrier that prevents moisture and acid from reaching the metal, thus inhibiting corrosion. Also, ensure proper ventilation around your batteries to prevent moisture buildup. Consider using battery terminal protectors to further shield the connections from the elements.
So, you’re planning a trip? Awesome! Don’t forget travel insurance! Seriously, it’s a lifesaver. Check out aon travel insurance for comprehensive coverage. They’ve got options to suit different budgets and trip lengths. Then, once you’ve compared a few options, you can also look at aon travel insurance for another perspective; sometimes different providers offer slightly different benefits.
Getting insured is a small price to pay for peace of mind, right?
Extending the Lifespan of the Battery Switch
The lifespan of a battery switch is significantly influenced by proper maintenance and usage. Avoid frequently switching the battery on and off unnecessarily, as this can contribute to wear and tear on the switch’s internal components. Regular inspections and prompt addressing of any corrosion or damage will significantly extend the life of the switch. Choosing a high-quality switch made from durable materials in the first place will also contribute to its longevity.
Remember that a well-maintained battery switch is a key component to a reliable and safe power system in your travel trailer.
Upgrading or Replacing a Battery Switch
Upgrading or replacing your travel trailer’s battery switch can significantly improve your camping experience, offering better control, increased safety, and potentially longer battery life. This section details how to upgrade to a more advanced system and safely replace a faulty switch, emphasizing crucial safety precautions throughout the process.
Upgrading to a More Advanced Battery Switch
An upgrade might involve moving from a simple on/off switch to a more sophisticated system, such as a battery disconnect with a remote control or a switch that incorporates a voltmeter to monitor battery voltage. This provides more convenient control and allows for better monitoring of your battery’s health. Consider the added convenience and safety features before making a choice.
For example, a remote switch allows you to disconnect your batteries from a distance, eliminating the need to crawl under your trailer. A voltmeter built into the switch provides a constant visual check on your battery’s charge level.
Replacing a Faulty Battery Switch
Replacing a faulty battery switch is a straightforward process, but safety is paramount. Improper handling can lead to electrical shocks or damage to your trailer’s electrical system. Always disconnect the negative battery cable before beginning any work on your electrical system.
- Disconnect the Battery: Begin by disconnecting the negative (-) battery cable from the battery. This is crucial to prevent accidental short circuits and electric shocks.
- Identify Wiring: Carefully trace all wires connected to the old battery switch. Take photos or make detailed notes of the wire connections before disconnecting them. This will make reinstallation much easier.
- Remove the Old Switch: Once the wires are disconnected, remove the old battery switch from its mounting location. This may involve unscrewing it or removing mounting brackets.
- Install the New Switch: Mount the new battery switch in the same location as the old one. Ensure it is securely fastened.
- Reconnect the Wiring: Carefully reconnect the wires to the new switch, matching them exactly as they were connected to the old switch. Refer to your notes or photos to ensure accuracy.
- Reconnect the Battery: After all wires are connected, reconnect the negative (-) battery cable to the battery.
- Test the Switch: Turn the new battery switch on and off to ensure it functions correctly. Check all connected appliances to confirm they work as expected.
Factors to Consider When Choosing a Replacement Battery Switch
Choosing the right replacement switch involves understanding your needs and the capabilities of different switches.
- Amperage Rating: The amperage rating of the switch must be equal to or greater than the total amperage draw of all your appliances and charging systems. A lower rating could lead to overheating and potential failure.
- Number of Batteries: If your system uses multiple batteries, ensure the switch is designed to handle the correct number of batteries and their configuration (parallel or series).
- Switch Type: Consider the type of switch: a simple on/off switch, a switch with a voltmeter, or a remote-controlled switch. Each offers different levels of convenience and monitoring capabilities.
- Mounting Style: Choose a switch with a mounting style compatible with your trailer’s existing setup. This might involve surface mounting or recessed mounting.
Battery Switch and its Role in Power Conservation
Your travel trailer’s battery switch is more than just an on/off switch; it’s a key component in managing your power resources and extending the life of your batteries. Understanding its function is crucial for maximizing your off-grid time and preventing premature battery failure. By strategically using the switch, you can significantly impact your power consumption and overall energy efficiency.The battery switch acts as a gatekeeper, controlling the flow of power to and from your house batteries.
In the “off” position, it completely isolates the batteries, preventing any drain from parasitic loads (devices that draw power even when turned off). This is invaluable when you’re not using the trailer for extended periods, effectively preventing a “dead battery” situation. In the “on” position, it connects your batteries to the trailer’s 12-volt system, powering lights, water pumps, and other appliances.
Some switches offer an additional “start” position, specifically designed to power the starting battery for your vehicle’s engine, avoiding the possibility of draining the house batteries used for your camper’s interior functions.
Battery Switch Settings and Their Impact on Power Consumption
Different battery switch settings directly affect how much power your batteries consume. The “off” position, as mentioned, completely cuts power to all connected devices, resulting in zero power consumption from the house batteries. The “on” position allows power to flow freely to all connected 12-volt appliances. The level of consumption depends entirely on what devices are active. For example, running the air conditioner and several interior lights will draw significantly more power than simply having a single interior light on.
A “start” position, if available, only connects the starting battery to the vehicle’s electrical system, leaving your house batteries untouched. This prevents accidentally draining your house batteries while starting your tow vehicle.
Strategies for Conserving Battery Power Using the Battery Switch
Effective battery management involves understanding and utilizing your battery switch properly. Before leaving your trailer unattended for any significant length of time, always switch the battery switch to the “off” position. This simple action prevents slow, unnoticed drains from parasitic loads, such as the refrigerator control board or carbon monoxide detectors. When camping, prioritize energy conservation by turning off lights and appliances when not in use.
Consider using LED lighting, which consumes significantly less power than incandescent bulbs. Regularly monitor your battery voltage to ensure you aren’t over-drawing power. If you notice your battery voltage dropping rapidly, it’s a sign to limit power usage or switch off non-essential appliances.
Examples of Power Consumption Differences with Varying Switch Settings, Battery switch on travel trailer function
Let’s imagine a scenario where your travel trailer has a total load of 10 amps. With the battery switch in the “off” position, the power consumption is 0 amps. In the “on” position, with all lights and the water pump running, the power consumption might be close to 8 amps. However, if you turn off the lights and water pump, the consumption could drop to 2 amps (for minimal parasitic loads).
If only the refrigerator is running, the consumption could be around 3 amps. The “start” position will show minimal to no draw from your house batteries. These examples highlight the significant impact that strategic use of the battery switch can have on battery life and power conservation.
Mastering your travel trailer’s battery switch is about more than just flipping a switch; it’s about understanding your RV’s electrical system and ensuring safe, efficient power management. By following the maintenance tips and troubleshooting advice provided, you can extend the life of your battery switch and prevent costly repairs. So, go forth and confidently power your adventures!
FAQ Corner
What happens if I leave my battery switch in the “off” position for an extended period?
Leaving the switch off for a long time won’t damage it, but it will prevent your house batteries from charging. Make sure to turn it on when you need to use your RV’s appliances.
How often should I clean my battery switch?
Inspect and clean your battery switch at least once a year, or more frequently if you notice corrosion or buildup. A simple wire brush and baking soda solution can do wonders.
Can I use a battery switch from a different RV in my travel trailer?
While it might
-seem* possible, it’s best to use a switch with the correct amperage rating for your system. Using an incorrectly rated switch can lead to overheating and potential fire hazards. Always check the specifications.
My battery switch is making clicking noises. What should I do?
Clicking sounds often indicate a loose connection or a problem with the switch itself. Inspect the connections for corrosion and tightness. If the problem persists, consider replacing the switch.
